Laravel 13x installation

Laravel is a free, open-source PHP web framework designed to make development faster, easier, and more enjoyable by providing built-in features like authentication, routing, queuing, and many others. Today, we will explore the installation process of v13x, which is the latest version of the framework as of May 2026.
Requirements
To install Laravel 13.x, you must consider the following requirements.
- PHP >= 8.3
- Composer
Additionally, you must have the following enabled PHP libraries.
- Ctype PHP Extension
- cURL PHP Extension
- DOM PHP Extension
- Fileinfo PHP Extension
- Filter PHP Extension
- Hash PHP Extension
- Mbstring PHP Extension
- OpenSSL PHP Extension
- PCRE PHP Extension
- PDO PHP Extension
- Session PHP Extension
- Tokenizer PHP Extension
- XML PHP Extension
If you want to make sure you have the necessary libraries installed, we recommend you to check the following posts depending on the operating system you are using.
- Install PHP extensions for Laravel 13 on Ubuntu
In addition to this, you must have the following Apache modules enabled
- mod_rewrite
Optionally, you may require the following software packages.
- Apache 2 - MySQL >=8.0
Installation
There are two main ways to create a project in Laravel. The first one involves using composer. The second way is to use an official Laravel package called Laravel Installer.
Creating a new project with composer
To create a Laravel project using only composer, you must use the following command.
composer create-project laravel/laravel my_new_projectIf you have a PHP version older than what Laravel 13.x requires, the above command will install an older version of Laravel suitable for the PHP version on your system.
The installation process will create the .env file and the encryption key for the new application. At the end, you'll see an output similar to the following.
root@f8ac7f1ca52b:/# php composer.phar create-project laravel/laravel my_new_project
Creating a "laravel/laravel" project at "./my_new_project"
Installing laravel/laravel (v13.6.0)
  - Installing laravel/laravel (v13.6.0): Extracting archive
Created project in //my_new_project
> @php -r "file_exists('.env') || copy('.env.example', '.env');"
Loading composer repositories with package information
Updating dependencies
...

No security vulnerability advisories found.
> @php artisan key:generate --ansi

   INFO  Application key set successfully.

> @php -r "file_exists('database/database.sqlite') || touch('database/database.sqlite');"
> @php artisan migrate --graceful --ansi

   INFO  Preparing database.

  Creating migration table ................................................ 37.63ms DONE

   INFO  Running migrations.

  0001_01_01_000000_create_users_table .................................... 10.45ms DONE
  0001_01_01_000001_create_cache_table ..................................... 5.26ms DONE
  0001_01_01_000002_create_jobs_table ...................................... 7.77ms DONE
Creating a new project with Laravel installer
After having composer installed, you must ensure that the composer binaries are properly configured to be able to execute these commands globally. Depending on the operating system you have installed, the following path should be added to the PATH variable.
| Windows | %USERPROFILE%\AppData\Roaming\Composer\vendor\bin |
| GNU/Linux | $HOME/.config/composer/vendor/bin |
| MacOS | $HOME/.composer/vendor/bin |
If you're not sure what the composer binaries directory is, you can find out with the following command:
composer global config bin-dir --absoluteOnce the requirements on the machine where we will install Laravel have been verified, you must install the Laravel Installer globally. To do this, simply execute the following command in the console:
composer global require laravel/installer
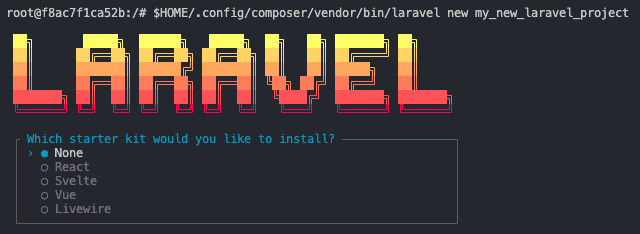
Once this is done, you will have the laravel command available in your terminal. To create a new project in Laravel, you can run the following command:
laravel new my_new_project
If you have a PHP version older than what Laravel 13.x requires, the above command will install an older version of Laravel suitable for the PHP version on your system..
If everything has gone well so far, you should see an interactive installer that allows you to choose between different stacks:
Configuration
Since Laravel uses certain folders to generate cache, views, and other utilities, it is necessary to assign the necessary permissions.
chmod -R a+w storage
chmod a+w bootstrap/cache
Steps for Installing an existing application
Keep in mind that some steps of the Laravel project installation are automated when creating a new project. If you already have a Laravel project uploaded to GitHub, Bitbucket, GitLab, or others, and you download it to install, you should follow these steps.
The first step is to install the dependencies.
composer installThe next step is to make a copy of the environment configuration file. As an example, Laravel includes the .env.example file that contains the necessary configurations for the application to work correctly.
cp .env.example .envFinally, we need to generate a unique key for the application, which will also be used to encrypt certain data managed by the framework.
php artisan key:generateWhen running this command, Laravel will automatically configure a value similar to the following in the configuration file .env.
APP_KEY=base64:8veiqlPhUQlfvofFGfARw7M4tHvqumRT223tXoq5JDz0=
If the project has migrations and data, you can run the following command to create the entire database structure and necessary data.
php artisan migrate --seedFinally, we need to configure the necessary permissions.
chmod -R a+w storage
chmod a+w bootstrap/cache
Running the application
To see our application in action, simply use the following command in the root of the project.
php artisan serveAfter this, we will generally access the application at the address http://127.0.0.1:8000 or on the port that Artisan finds available.
If you want Laravel to work on your WAMP, LAMP web server, or custom Apache and PHP installation, you need additional configuration. You can refer to the following post if you want to configure a virtual host for Laravel on Apache.
- Configuring virtual host for Laravel with Apache
At this point, we will know that we have successfully completed the installation if we see the main screen of our application at the address of our localhost. See you soon!.