Configure NameServers in WHM

In our previous post we saw How to install WHM on AWS. Following the installation, the next step is to configure the server names so that our clients' domains can point their domains to our DNS.
Domain Configuration in your Registrar
You must perform this configuration in the DNS management administration panel of your registrar and there are two ways to do it that you will see below.
Using your registrar's NameServer
In this case, you will manage the DNS records of your main domain from your registrar. You must create at least four A records to the IP where the AWS WHM resides.
dominio.com           @      ip-de-whm
ns1.dominio.com       A      ip-de-whm
ns2.dominio.com       A      ip-de-whm
hosts.dominio.com     A      ip-de-whm
It is ideal to use a different IP for your second server name, in this case ns2.dominio.com. The other thing you must do is register your own nameservers. You can find this in many registrars as NameServers or Child nameservers. You must register an IP for each nameserver.
ns1.dominio.com       ip-de-whm
ns2.dominio.com       ip-de-whm
This last configuration could take between 24 to 72 hours to take full effect.
Using WHM NameServer
WHM brings integrated various domain name control systems including BIND and PowerDNS. Using this option, the control of the DNS records of your main domain will be completely under the control of WHM.
For this, you must create as in the previous step two private nameservers or Child nameservers. You must register an IP for each nameserver.
ns1.dominio.com       ip-de-whm
ns2.dominio.com       ip-de-whm
This configuration may take 24 to 72 hours to take full effect. Once this is done, you must change the nameservers of your domain to be managed through these private servers. You can find different ways to configure this depending on your registrar, you can consult How to Set Up Nameservers in a cPanel & WHM Environment for more information on this.
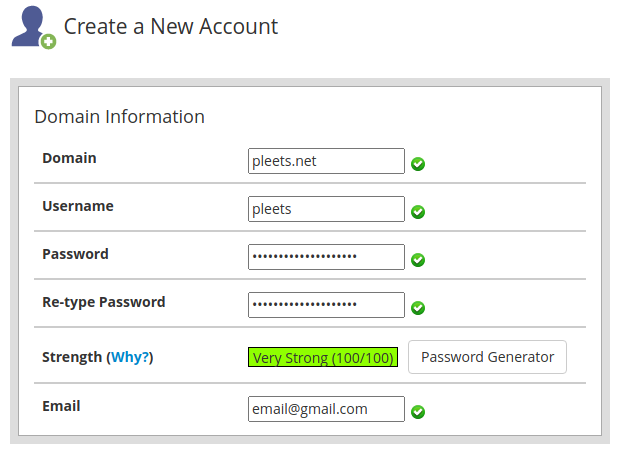
Main cPanel Account Creation
In WHM we go to Account Functions > Create a New Account and create an account for our domain.
NameServer Configuration
You must go to Server Configuration > Basic WebHost Manager Setup and configure some server names. For example, if your domain is pleets.net you can configure ns1.pleets.net and ns2.pleets.net.
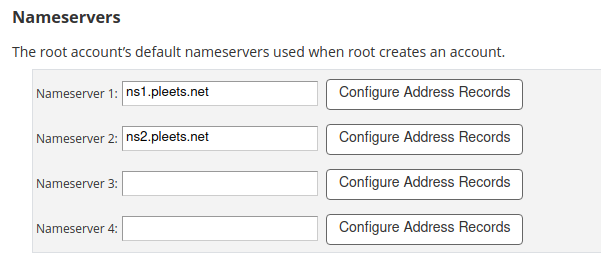
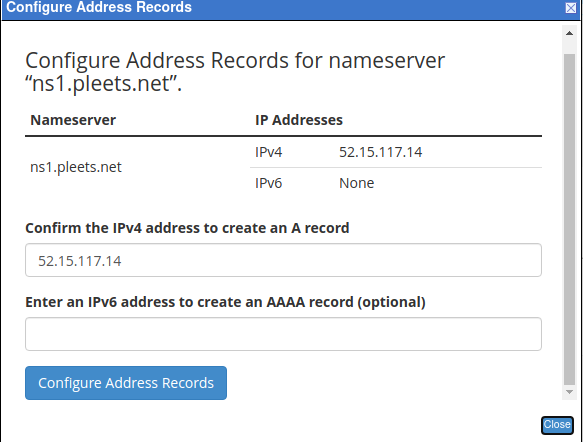
You must also configure the address records (Configure Address Records). Each DNS must point to the WHM IP address. As mentioned earlier, it is ideal that they be different IPs for each DNS.
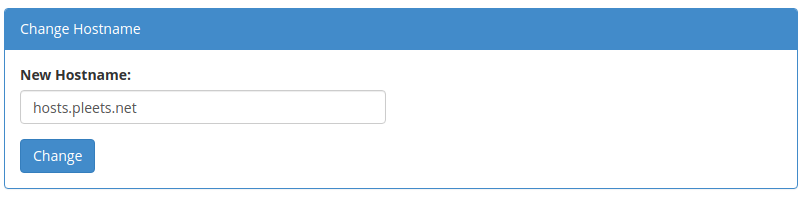
HostName Configuration
The hostname could be a subdomain of your main domain. To configure this parameter, you must enter DNS Functions > Add an A Entry for your Hostname or Networking Setup > Change Hostname. For example, we could place hosts.pleets.net.
After changing the hostname, you should be able to access your WHM from the address associated with your host with port 2087, or use your host name plus /whm.
https://hosts.dominio.com:2087
https://hosts.dominio.com/whm
Note that cPanel will create an SSL certificate for that domain. This process may take a couple of minutes. You can also verify your primary domain in the browser by directly accessing it.
To enter any cPanel account, you can use the address you configured above for the hosts on port 83, or use your server name plus /panel.
https://hosts.dominio.com:2083
https://hosts.dominio.com/cpanel